Connect With Me In Facebook

Welcome to DefendHackers, If u want to Apply for a Blogroll as a Author , With h4ckfreak Mail me @ suren.click@gmail.com

Mark Zuckerberg tells 8th graders “there’s no shortcuts” and to make friends

By h4ckfreak

Metasploit Quick Start Referennce Guide

Metasploit Quick Start Referennce Guide , By h4ckfreak

IP Security

IP Security By H4ckfreak.

15 Network Admin Apps for Android

15 Network Admin Apps for Android , By h4ckfreak

Break All OS Passwords Using KON

Break All OS Passwords Using KON , By h4ckfreak

Recover Or Reset Ur Windows Pwd Using Ubuntu

Recover Or Reset Ur Windows Pwd Using Ubuntu , By h4ckfreak

Security Blueprint For Ethical Hackers..

By h4ckfreak

Blocking IP Using IPSec

By h4ckfreak

Preventing DDos Attacks, Combat Steps abd Tools...

By h4ckfreak

Monday, October 8, 2012

New wireless router block some sites, oh it is blocking microsoft.com


I initiated a thread in my facebook defend hackers group for seeking a help to resolve my issue:


I was using a ADSL broadband connection from India's largest ISP - BSNL. I was using an ancient modem/router to connect to Internet - Pronet PN-ADSL 101E/U:
As you can see below it has only one RJ45 out. So I was able to connect only one PC at a time. And currently I have two desktops and a laptop. So it was really headache to wait till my dad or brother accessing Internet on other PC.
So I decided to buy a new one. I went for a ADSL-less wireless router, since I wanted to ensure that the new one will work with cable net too (in case I change my ISP). So I bought TP-LINK wireless router: TL-WR941ND on Flipkart:
I configured my ADSL modem/router in bridge through its management console 
To open management console of any router, you have to connect to it through wire. You cannot configure router when you are connected wirelessly. 
Management console of old modem/routers usually opens up when you put http://192.168.1.1/  in the browser's address bar. If it doesnt open up, you may need to change the IP address of your NIC to something 192.168.1.5 (the last number can be anything but not 1), subnet mask to 255.255.255.0 and the default gateway to 192.169.1.1:
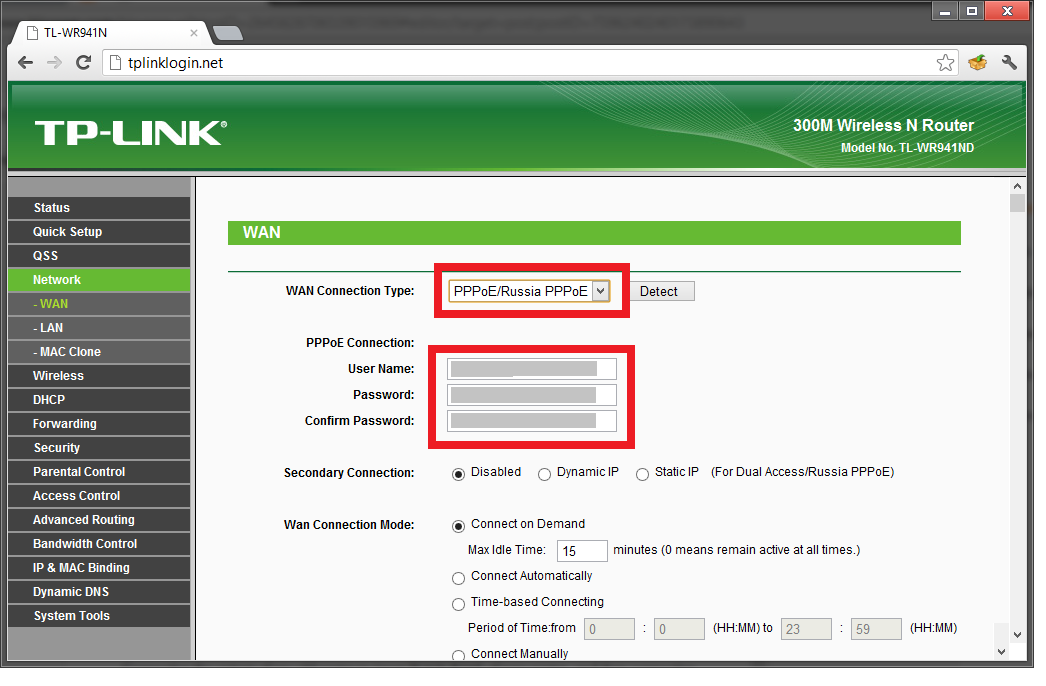
For new routers the address for management console may be different (You can also try 192.168.0.1). Usually you can find the default domain name in the router's manual. This domain name can be put in the browser's address bar instead of IP address. For example my new routers user guide says that default domain name is http://tplinklogin.net, the default IP address is 192.168.0.1.
When you put appropriate address, it asks for username and password which is usually admin and admin for most routers (check manual if it does not work ). 
The bridging option can be done in management console. Generally the option shows in  the Advanced Network Setup option. ( However different routers have different management console layout, so just check the manual ):
Then I setup router in following way:
Connecting the output of my old router to input WAN RJ45 of new router and then connecting my PC to anyone of the LAN ports of new router. Then I configured the new router in PPPoE through its management console and entered the username and password so that my new router will automatically login to the connection from my old router:
Oh yes, if you have changed your PC's IP address using procedure above while trying to open up your router's management console, change it to "Obtain an IP address automatically" (thats what usually ISPs do, but you may need to check with your ISP):
With that done I was able to connect my new router both through wire and wirelessly, but then there was a problem - it is not allowing access to some sites. Most notably yahoo.com (though ymail was working ), msn.com and yeah microsoft.com toooo. So that was seriously unacceptable. I did quick google and got some suggestions like adding rules to router to allow some ports. I did many of them but none worked. After hours of search I read something about Maximum Transfer Unit (MTU):
MTU of a communications protocol of a layer is the size (in bytes) of the largest protocol data unit that the layer can pass onwards. If the MTU size set in your router exceeds that can be handled by the devices at the backbone or by your ISP, then it may lead to packet retransmissions or eventually some sites getting blocked (at the router which cannot handle the bigger MTU sizes). Too small size may lead to excessive fragmentation, header overhead and acknowledgements.
Some sites went on saying:
The usual minimum MTU size for dial-ups is 576. So, with MTU = 576, possibility that the problem is solved is more. So change the MTU size to 576 and then go on increasing it by ten while checking whether connection works or not. The optimal MTU size will be the maximum one where router shows up all the websites.
Changing MTU to 576 surprisingly worked for me, but then I went to check out what will be the optimal MTU size. So the obvious idea was to check the MTU of the old router. First I connected my PC back directly to the old router. But the old routers' management console was so dumb that it did not showed anything called MTU (forget about changing MTU size). So I went on checking the other ways to check MTU size for the old router. And fortunately I found some DOS commands. This one really worked for me:
                   C:\Users\suren>netsh interface ipv4 show subinterfaces     
I realized that the MTU size for my connection was 1460:

So I just went to the management console of new router (of course I connected my routers back in the setup showed above) and changed the MTU size from the default of 1480 to 1460:
And finally things started all working. That difference of 20 bytes was making all the mess!!! Now I can access all sites and yes microsoft.com too!!!!

Tuesday, October 2, 2012

Cracking With Cloud Amazon


Amazon EC2 is providing what they call “Cluster GPU Instances”:  An instance in the Amazon cloud that provides you with the power of two NVIDIA Tesla “Fermi” M2050 GPUs. The exact specifications look like this:
22 GB of memory
33.5 EC2 Compute Units (2 x Intel Xeon X5570, quad-core “Nehalem” architecture)
2 x NVIDIA Tesla “Fermi” M2050 GPUs
1690 GB of instance storage
64-bit platform
I/O Performance: Very High (10 Gigabit Ethernet)
API name: cg1.4xlarge
GPUs are known to be the best hardware accelerator for cracking passwords, so I decided to give it a try: How fast can this instance type be used to crack SHA1 hashes?
Using the CUDA-Multiforce, I was able to crack all hashes from this file with a password length from 1-6 in only 49 Minutes (1 hour costs 2.10$ by the way.):
Compute done: Reference time 2950.1 seconds
Stepping rate: 249.2M MD4/s
Search rate: 3488.4M NTLM/s
This just shows one more time that SHA1 for password hashing is deprecated – You really don’t want to use it anymore! Instead, use something like scrypt or PBKDF2! Just imagine a whole cluster of these machines (which is now easily available to anybody thanks to Amazon) cracking passwords for you. Pretty comfortable, large-scale password cracking for everybody!
Some more details:
If I find the time, I’ll write a tool which uses the AWS-API to launch on-demand password-cracking instances with a preconfigured AMI. Stay tuned either via RSS or via Twitter.
Installation Instructions:
I used the “Cluster Instances HVM CentOS 5.5 (AMI Id: ami-aa30c7c3)” machine image as provided by Amazon — I chose this because it was the only image with CUDA support built in — and selected “Cluster GPU (cg1.4xlarge, 22GB)” as the instance type. After launching the instance and SSHing into it, you can continue by installing the cracker:
I decided to install the “CUDA-Multiforcer” in version 0.7, as it’s the latest version of which the source is available. To compile it, you first need to download the “GPU Computing SDK code samples“:
# wget  http://developer.download.nvidia.com/compute/cuda/3_2/sdk/gpucomputingsdk_3.2.12_linux.run
# chmod +x gpucomputingsdk_3.2.12_linux.run
# ./gpucomputingsdk_3.2.12_linux.run
(Just press enter when asked for the installation directory and the CUDA directory.)
Now we need to install the g++ compiler:
# yum install automake autoconf gcc-c++
The next step is compiling the libraries of the SDK samples:
# cd ~/NVIDIA_GPU_Computing_SDK/C/
# make lib/libcutil.so
# make shared/libshrutil.so
Now it’s time to download and compile the CUDA-Multiforcer:
# cd ~/NVIDIA_GPU_Computing_SDK/C/
# wget http://www.cryptohaze.com/releases/CUDA-Multiforcer-src-0.7.tar.bz2 -O src/CUDA-Multiforcer.tar.bz2
# cd src/
# tar xjf CUDA-Multiforcer.tar.bz2
# cd CUDA-Multiforcer-Release/argtable2-9/
# ./configure && make && make install
# cd ../
Since the Makefile of the CUDA-Multiforcer doesn’t work out of the box, we need to open it up and find the line
CCFILES := -largtable2 -lcuda
Replace CCFILES with LINKFLAGS so that the line looks like this:
LINKFLAGS := -largtable2 -lcuda
And type make. If everything worked out, you should have a file ~/NVIDIA_GPU_Computing_SDK/C/bin/linux/release/CUDA-Multiforcer. You can try the Multiforcer by doing something like this:
# export LD_LIBRARY_PATH=/usr/local/lib:$LD_LIBRARY_PATH
# export LD_LIBRARY_PATH=/usr/local/cuda/lib64:$LD_LIBRARY_PATH
# cd ~/NVIDIA_GPU_Computing_SDK/C/src/CUDA-Multiforcer-Release/
# ../../bin/linux/release/CUDA-Multiforcer -h SHA1 -f test_hashes/Hashes-SHA1-Full.txt --min=1 --max=6 -c charsets/charset-upper-lower-numeric-symbol-95.chr
Congratulations, you now have a fully working, CUDA-based hash-cracker running on an Amazon EC2 instance.

Saturday, August 25, 2012

Log In Using Pen Drive Instead of Passwords


 Idk how many of you worried about not having finger sweep or face recognition auth to loggin in ur system but there is always al alternative a brand stuff called

Whats the Story ?
 
SYSKEY is a utility that encrypts the hashed password information in a SAM database in a Windows system using a 128-bit encryption key.
Ok , What it Does:
 It was meant to protect against offline password cracking attacks(Opcrack , Kon Boot , NT OFFLINE e.t.c ) so that the SAM database would still be secure even if someone had a copy of it.

NOTE:  I haven’t tested copying data from 1 USB to another USB to see if it works as a backup.  This way you could lock up a USB drive as a spare if needed.
Here’s how to get this to work using a USB drive.
1.  Insert your USB drive into your system and wait for it to be recognized and install any necessary drivers.
2.  Fire up disk management and re-assign the drive letter it was given to “A”.

                                    Start up disk management by clicking Start and typing "diskmgmt.msc"


Right-click the USB drive and choose to assign driver letter or path.


Right-click the USB drive and choose to assign driver letter or path.  Assign it to letter “A” Or Wateva you want

Accept the warning message

Now your USB drive is “A”


 Run Syskey and save encryption to USB Drive “A”


                                                       Click Start and type syskey followed by hitting Enter


Syskey launched; Click “Update”


Choose “Store Startup key on   floppy disk” and click “OK”

                                     
You’ll be prompted to enter your diskette. Make sure your USB drive is inserted and writable.
Whooph, Finally , Reboot and have fun.  Don’t lose your USB disk!  Also, to revert this, you can run syskey again and choose to store it locally instead of “on a floppy disk”.

Thanks,
h@ckfr3ak

Thursday, May 24, 2012

Stealing Credentials via MITM Attacks -- ARPSpoof + SSLStrip + IPTables


 Well Back today with couple of interesting tools and how they can be used to steal data from network users. Specifically, we'll be going after login credentials to various secure sites, such as facebook and Twitter, flipkart e.t.c.

NOTE: This tutorial is intended to instruct current and up-and-coming pen-testers on methods that can be used to determine security on specific networks which they have permission to attack. Executing this attack without permission is illegal, and I do not personally condone such behavior.

There is a video that tells you how this attack works, for those of you too impatient to sit and read, but this tutorial will include more specific information which the video does not reveal, as well as a script specifically written to make life simpler when executing this attack.

The video can be found here: Hak5 SSLStrip Tutorial


Go ahead, view the video. The rest of the class will wait here patiently until you return.

and i have opened a thread in hak5forums  which answers my basic questions  by elite peoples i want you all to read those threads and come back here


Here its

Did you watch it? Good.have you read !Well GLAD !!

In today's lesson we're going to need the following tools:


Now, on to business.

What we're going to do today is perform a basic Man-In-The-Middle (MITM) attack on the users of our unsuspecting Target Network.

What is a Man-In-The-Middle attack?

I'm glad you asked. Here's a definition from our trusty friend, Wikipedia:

"In cryptography, a man-in-the-middle attack ... is a form of active eavesdropping in which the attacker makes independent connections with the victims and relays messages between them, making them believe that they are talking directly to each other over a private connection, when in fact the entire conversation is controlled by the attacker."

In layman's terms, a MITM attack places the attacker between two unsuspecting targets, allowing him or her to intercept their communications.

Your next ques would be ""How does one perform one of these attacks""?

Good question. There are many ways of performing man-in-the-middle attacks, especially on computer networks. Today we're going to focus on one called "ARP Spoofing" or "ARP Cache Poisoning."

To understand how this works, I'll give you a little bit of background.

ARP Spoofing takes advantage of vulnerabilities in the Address Resolution Protocol. This protocol (ARP) basically helps systems on a network determine what IPs are associated with what MAC addresses.

Note: Guys i dont suggest you to use the SMAC tool its a script kiddie tool am not sure whether it will be 100percent anonymous, Since its the most downloaded in cnet.com , i would like to get ur input on this contact me via suren.click@gmail.com

When a computer connects to a network, it needs certain information to allow it to get online. For example, it needs to know the IP of the gateway, where it will route all traffic. But knowing an IP is worthless unless you have a MAC address you can link it to. Without a MAC, an IP is simply a number, and systems won't know which interface or which system to communicate with.

So, for example, let's say you hook your computer to the local wifi. Here's what happens:


  1. Your computer will connect to the network, then will ask for the default gateway's MAC address via ARP. (Hi, I'm new here, who owns this place?)
  2. The router will see the ARP request, and send its MAC address. (Hey! I'm the router. Anything you need, you come to me first.)
  3. The computer will assign that MAC to the router's IP, and will continue on its merry way.

Thing is, systems don't just ask for the MAC once -- sometimes errors happen, sometimes routing tables change, so it is necessary to occasionally update the ARP tables to make sure they're up-to-date.

ARP Spoofing allows us to take advantage of this. Here's how that works:


  1. Your computer asks for the MAC for the gateway. (Hey, haven't seen router around, anyone know where he is? Just want to make sure he's still here.)
  2. The attacker will step in and claim to be the router. (Hi! I'm the new owner, you can talk to me.)
  3. Your computer will blindly accept this claim! (Oh, cool! Nice to meet you!)
  4. Meanwhile, when the real router shows up, the attacker's system will pretend to be your computer. (Hey! How's it going? So-and-so asked me to take his place, so if you don't mind, you can talk through me.)
  5. The router will also blindly accept this claim. (Cool, cool. Let him know I said hi!)

At this point, the attacker's computer has tricked the victim into thinking that it is actually the router, and has tricked the router into thinking it is the victim! So now, when the victim and router decide to talk, they end up speaking with you instead, allowing you to know everything they're saying (and change it up).

So how do I become the man-in-the-middle?

I'm getting to that! Be patient!

So in order to use ARP poisoning to become the MITM, you would need to perform the following steps:


  1. Set up port-forwarding on your Linux box.
    1. Code:
      echo '1' > /proc/sys/net/ipv4/ip_forward
    2. This tells your computer to forward any packets that weren't intended for your machine.
  2. Find out which system on your network is the gateway (e.g. router).
    1. Code:
      netstat -nr
    2. This will inform you about which IP belongs to the gateway. Usually it's something like 192.168.1.1.
  3. Use ARP Spoof to put yourself between the router and all other systems on the network.
    1. Code:
      arpspoof -i wlan0 192.168.1.1
    2. You will need to change "wlan0" to reference whatever device is currently connected to the network -- usually eth0 or wlan0.
    3. You will need to change "192.168.1.1" to the IP of the gateway through which your system connects. (See step 2.)
    4. If you watched the Hak5 video above, you'll notice that we didn't define a target via the "-t" option. In the Hak5 video, they were attacking a specific target. In THIS tutorial, we're attacking the entire network.
    5. NOTE: Under heavy loads, using arpspoof on an entire network can cause the network to crash, making the internet unavailable to all users. This makes it pretty obvious that something is up, and sysadmins will be doing what they can to fix the problem. Should this ever occur, stop the arpspoof process using 'ctrl-c' and wait a moment. The network should start working again, once the router informs everyone of its MAC. Then you can start your attack again, if you're so bold. (If you're worried about being caught, e.g. in a library or public place, just pretend like you're having trouble too and most people will ignore you.)
Having executed these steps, you will begin to see ARP Spoof actively rerouting all traffic through your system. You have now successfully become the Man in the Middle!

But how do I take advantage of this position?

Well, from this point, we can easily use tools like wireshark to sniff all network traffic and see what everyone's up to. Or we can reconfigure our firewall setup to deny access to specific IPs, effectively booting them off the network. Or we could use tools like the middler to actively change the traffic going through the network!

But we're not going to talk about those tools today -- that would be another tutorial altogether. Today we're going to learn how to use a fun tool called SSL Strip to steal login credentials from users.

What is SSL Strip?

SSL Strip is a tool written by Moxie Marlinspike and released at Black Hat DC 2009. It basically reroutes encrypted HTTPS requests from network users to plaintext HTTP requests, effectively sniffing all credentials passed along the network via SSL. The way it does this is it lets users connect via HTTP, logs their information, then redirects their connection to the originally-intended HTTPS server on the internet.

This all happens on the fly, and is practically invisible to users. The only way to notice is by checking the URL in the address bar: where normally it would display HTTPS, it will now display HTTP instead. (But on some sites, like Facebook, Myspace, and many others, the URL will never display HTTPS, so this attack will be impossible to detect by simply checking the URL.)

So how do we execute this attack?

Here's how:


  1. First things first -- we need to set up a firewall rule (via iptables) to redirect requests from port 80 to port 8080 -- this will ensure that our outgoing connections (from SSL Strip) get routed to the proper port.
    1. Code:
      iptables -t nat -A PREROUTING -p tcp --destination-port 80 -j REDIRECT --to-port 8080
  2. Now that we've got our firewall setup, we need to execute the MITM instructions listed earlier.
    1. Code:
      echo '1' > /proc/sys/net/ipv4/ip_forward
      arpspoof -i wlan0 192.168.1.1
  3. Once arpspoof starts running, open a new terminal and start SSL Strip.
    1. Code:
      sslstrip -k -l 8080
    2. The "-k" designator tells the system to kill all currently active sessions, forcing users to re-login to their websites.
Now that we've started our MITM attack and got SSL Strip actively intercepting packets, all we have to do is sit and wait. SSL Strip will run as long as you want it to, and it will log all captured information in a file called sslstrip.log.

If you want to watch this file as it grows, you can use the 'tail' command. This is a fun tool that helps you watch logfiles as they're modified in real-time.

Code:
tail -f sslstrip.log
The "-f" modifier tells tail to follow the file until you tell it to stop.

Sweet! I've intercepted lots of traffic! Now what?

Once you're done with your attack, use the ctrl-c key combination to kill the 'tail,' 'sslstrip,' and 'arpspoof' processes. The sslstrip.log file will remain, and the system will stop being the MITM.

NOTE: As soon as the arpspoof process is ended, the network will go down temporarily. This is because arpspoof doesn't automatically repopulate ARP tables with the router's proper MAC, so systems are left in the dark until the router gets around to telling everyone its address. This problem shouldn't last long, but it happens to ALL systems on the network -- so it's best to play along (as if you're having trouble too). Immediately fleeing the premises is a pretty obvious clue that you had something to do with the outage.

After shutting down all processes and disconnecting from the network, you can safely go home and analyze the logfile you've made. It might look like a bunch of gobbledygook:
Code:
2010-06-27 20:38:24,482 SECURE POST Data (login.facebook.com):
charset_test=%E2%82%AC%2C%C2%B4%2C%E2%82%AC%2C%C2%B4%2C%E6%B0%B4%2C%D0%94%2C%D0%84&locale=en_US&email=user%40email.com&pass=password&charset_test=%E2%82%AC%2C%C2%B4%2C%E2%82%AC%2C%C2%B4%2C%E6%B0%B4%2C%D0%94%2C%D0%84&lsd=H2cF2
But if you look closely, you'll notice that the username and password used to log into the site are there, plain as day!

Of course, it's not easy parsing through huge files full of this kind of garbage, and often times we encounter sites we don't need to see.

What can we do about this problem?

Well lucky for you, I've already written a tool specifically to parse the sslstrip.log files! Here's the source code (it's in python):

Look at the Code


This script uses a definitions file and a blacklist file (named "definitions.sslstrip" and "blacklist.sslstrip" respectively) to weed out the information you need.

These files are stored in a subdirectory called "resources".


Here's what they look like:

(resources/blacklist.sslstrip)

CODE:

touch.facebook.com
urlcheck.hulu.com
uts.amazon.com
webmail.aol.com
www.adotube.com
www.facebook.com
www.overstock.com
www.slideshare.net


 Simply add each URL that you wish to ignore, and it'll prevent the script from parsing those URLs.

(resources/definitions.sslstrip)


As you can see, each definition is listed in the following manner:

Code:
URL|Name Of Site|username_variable|password_variable|other_variables
It's relatively easy to add new definitions as you discover them!

Once you've got these files set up, all you have to do is put the sslstrip.log file in the same directory as the parselog.py script, then run it.

Code:
parselog.py | less
(I pipe the output to the 'less' so that I can parse the resulting output easier.)

You'll see output similar to the following:

Code:
(Facebook) email = user@email.com :: pass = password :: **NEW**

 The script will print all discovered logins (marking new logins as **NEW**) as well as all unknown URLs found. These unknown URLs can be used to help you define new entries for the 'definitions.sslstrip' list.

All accounts found will be added to a file called 'accounts.txt' for your viewing pleasure, arranged alphabetically by the website they belong to.

And that's that!

What can I do to prevent this attack from hurting me?

There's not a whole lot you can do, though there are some defenses outlined here.

My suggestion is this: If you're ever on a public network, or if your personal wifi is unsecured, don't use that network to log into any of your personal accounts, unless you've got another defense in place.


One fun trick is to use SSH tunneling to route your traffic. If you've got an account on a secure box out in the internet somewhere (for example, a linux system hosted on the cloud), you can create a SSH tunnel to that box and route your traffic through the tunnel. That way, no matter who is listening in on your connection, all traffic is encrypted and there's little they can do to intercept it.

.

 I hope this tutorial has been informational and fun for all involved! Take care, and happy hacking!

Friday, April 27, 2012

FTP Server Set Up With File Zilla

Introduction:

There seemed to me some need for a guide to setting up a FTP server for at-work to offer FTP srevice to mi remote Administrative office.


Requirements:

  • FileZilla Server
  • FileZilla Client(most suggested but other ftp clients will work)
  • Home LAN setup with administrative abilities over your router(optional for internet server)
Download:


Navigate to http://filezilla.sourceforge.net/ and select the "Download" option from the right. Then select the server option. You may then choose either the Windows executable if you intend to run the machine from a Windows environment or the platform independent version if you plan to run it on any version of Linux/Unix or Macintosh.

Installation:

Installation is pretty quick. There is a few key options that you should make that vary depend based on how you intend to run this machine so i'll explain each briefly as I come to it.


At this point, you can make any options you see fit but I do suggest setting up the administrative interface as it makes the administration far more simple from the local machine and it takes up little to no extra space.

If you are installing this to simply administer a server(i.e. having multiple admins on, say, an in-home file server)you will only need to install the administration interface.


Here you will decide how you would like to install the FTP service. I have chosen to install it as a service operated manually. This is really a preference as I don't like anything on my computer to really start on its own. However, if you intend to run this on a remote machine that will have no real other use, you might want to set this as a remote service started automatically in case of a reboot. You can, of course, also set it to simply run on demand.

Additionally, this is the port that you will specify the remote administration port. It is best to leave it at its default value but if, for some reason, you would like to use another port: specify it now. Be sure to forward that port correctly as well(covered later).

Running FileZilla Server:


When you start up FileZilla Server it will ask you what server you would like to administrate.

If the machine is local: use the settings above making sure to specify the right port.

If the machine is remote: specify the IP and port.

Settings:

Select Edit > Settings and look into some of the changes.


Here you can leave pretty much default. My only suggestions are to change some of the timeout options if you don't want/need users to be disconnected. Also, change the Listen Port now if the server will be accepting client requests on some OTHER port. Again, be sure to reflect this change in your port forwarding options.


Nothing much here EXCEPT to set an admin password for your server. Be sure to set it to something you don't mind sharing if you intend to have multiple admins but make it secure enough that anyone who knows about your server can't gain access to the administrative rights.


This seems to be the part where most people stumble in their setup and I am not sure why. This is fairly basic and doesn't require nearly as much concern as most people give it. If you are behind a firewall/router that operates under NAT: select "Use the following IP:" and enter in your IP into the field.

Also, you will have to forward a range of ports for passive users to use. The FileZilla FAQ suggests 5000-5100 and I will go with this as well. Unless there is a problem with this number, use it. Make sure to set this as a range inside your router.

Users & Groups:

This is pretty basic stuff so I'll keep it brief. You will want to create groups to manage users but its not needed. It makes the sharing of a single file over multiple users easier. I'll start with making groups:


Pretty simple: make the appropriate group and fill in any needed information.


This is the gravy of the section. Set up which ever files you intend to share. These files will be accessible by ANYONE in the group, so add files carefully and add users even more carefully. In my example with admins: i will want admins to be able to have full permissions on the files so that new stuff can be added and old stuff removed.

Now for specific users:


Now we can add a user and give him group membership. Be sure to set this carefully as it will determine the access to particular files across groups. If you add a user to a group, that groups selected home directory will become the users home directory.


We can now add files/folders for the user. Be sure to set a home directory and set up an aliases(Linux/Unix). This is a bit more advanced and I suggest trying to share all the stuff you intend to share in a single folder to simplify things.

How do aliases work?

Let's assume you have two shared folders: c:\ftproot is your homedir and d:\myfiles is the second one. In order to display an alias to d:\myfiles in your homedir, add c:\ftproot\myalias as alias to d:\myfiles. A new folder with the name myalias will apear in your homedir with the contents of d:\myfiles
Source

Port Forwarding & Ranges:

See this site: http://www.portforward.com/english/r...outerindex.htm

Be sure to forward these ports(following this guide):
  • 5000-5100 (passive range)
  • 21 (listen)
  • 14147 (admin interface)
Also, if you are operating behind a Windows based firewall add port 21 and the filezilla server executable to the exceptions list.

Conclusion:

There it is. This is your basic startup guide to getting a FileZilla Server on its feet. Please post questions and any suggestions I could make here. I'll try to keep this up-to-date with answers to more commonly asked questions

Wednesday, April 11, 2012

Asterisk - A Complete Telecommunication Platform


Hope you all had some idea about what is Open-BTS now lets dig wats Asterisk all about, since we have to use the both OpenBTS and Asterisk, in order to create ur own gsm network now ill take u thro asterisk tutorial..


If u missed the OpenBTS article click here
OpenBTS


Asterisk is a software that helps u to connect from ur IP based Phone to wired connected land line networks and PSTN networks, via the VOIP service u may subscribed from any provider..
So hardware(OpenBTS + Astrisk is needed to create Networks Or To Tapping the calls)..Tapping calls made easier because  Ur handsets not authenticating the Base station(Tower) when it registering ur number, wen moved away from another tower..! So when two users speaking you can easily create a session using Session Initiaion Protocol along(SIP) with ur Subscribed PBX Connection..u will be in the same line like three way calling !!!
Alright ,
Am compiling this article from various resources and watching couple of defcon videos that I found in internet,when I researched about OpenBTS, ASTERISK, Call center softwares,
In Future let me try Demonstrating the Simple GSM network , Inputs are welcomed
Here is the Schematic:


SETUP NEEDED :
1. IP PBX
2.Soft Phones(Touch Dialler Software)
3.Gateway IP Address of the VoIP Service that help you to talk/intercept calls with PSTN Users


ASTERISK USAGE :

Asterisk used in all places neealy from Software companies, Call centers , Live On training Classes , Video Conferencing e.t.c


You can either use it for ur home and business uses, so I assume u have a Broadband network
doesn’t matter either u behind NAT all u need a good internet speed that carry your up and down stream to carry your voice

SET UP
 1. IP PBX  , 2. PHONES(Soft Phones) ,  3. SIP GATEWAY


1.IP PBX:  You will need a computer to run the IP PBX , Yeah a standalone system
2.PHONES(Soft Phones) : Either u can get a Soft Phone or SIP Phone ?

Ok,What are SIP Phones?


SIP Phones are the same thing as VoIP Phones or soft phones. These are telephones that allow phone calls to be made using VoIP (voice over internet protocol) technology.
There are two types of SIP Phones. The first type is the hardware SIP phone, which resembles the common telephone but can receive and make calls using the internet instead of the traditional PSTN system.

SIP Phones can also be software-based. These allow any computer to be used as a telephone by means of a headset with a microphone and/or a sound card. A broadband connection and connection to a VOIP provider or a SIP server are also required.

SIP Gateway :

I presume you want to communicate with others on the PSTN network, so you need to obtain gateway service.  Since part of the call is being carried on the circuit switched network, it costs real money.  This means you will have to pay for this part of the system. 

Step 1 – Sign Up for Service

This section takes you through signing up with VoipJet and BroadVoice.  I am using two service because
  1. it is less costly, if you use it a lot, and
  2. it illustrates how to set up two different kinds of trunks.

VoipJet


Browse to http://www.voipjet.comSine up for service. Then log on and follow the line describing how to set up Asterisk. You will need to copy down your “VoipJet account number (username),” your “Authorization code (password),” and your server IP address (depending on your location).  Ignore the rest of the setup instructions.

BroadVoice


Browse to http://broadvoice.com.  Sign up.  Say “I want to use my own SIP device”.  When it asks what type of device, select “Not Listed (Generic SIP).  When it asks for details, just say “Asterisk”.  Next, pick your phone number.  Next pick your plan.  I recommend “BroadVoice BYOD Lite.”  Once you have finished the sign up process, log in, click on “Account” and follow the “Show Settings” link in the “Your Devices” section.  This section gives your phone number (in case you forget) and your password (you will need this later). 

1.   Ping the following hosts: proxy.lax.broadvoice.com, proxy.dca.broadvoice.com, and proxy.mia.broadvoice.com.
2.      Pick the one with the lowest latency.  In my case, it was proxy.dca.broadvoice.com.
3.      Use nslookup to get the IP address of proxy.dca.broadvoice.com.  In my case it is 147.135.0.128

Step 2 – Set Up SIP Softphone

Download and install XLite from http://xten.com

Run XLite.  Click on the “Menu” icon to configure it.  Click on “System Settings”, then “SIP Proxy”, then “Default”. 
Fill in the following fields:


User name: 200
Authorization user: 200
Password: abc123
Domain/Realm: 192.168.0.40
SIP Proxy: 192.168.0.40

It should look something like this.

 
The phone will try to register, but for now it will fail.

Get the Software

AAH can be downloaded from http://asteriskathome.sourceforge.net.  Download the basic ISO file, and burn it to a CD as a bootable volume (exercise left to reader).

Load AAH

This is going to reformat your hard disk and load everything from the operating system on up, so make sure there is nothing on the hard drive that you want to save. 
Boot your machine from the CD.  When it prompts, type ENTER.  Then wait as everything loads and compiles.  This could take 30 minutes or more, depending on how fast your computer, hard drive, and CDROM are.  At the end, it ejects the CD and reboots from the hard drive. 
The initial login is:

username: root
password: password

Set Up Networking

The machine probably got an IP address from DHCP, but it is not what you want.  Log in as root and run:
netconfig

It will display setup information.  You should enter the following:

IP address: 192.168.0.40
Netmask: 255.255.255.0
Gateway: 192.168.0.1
DNS Server: 192.168.0.1

OK these changes, then reboot the machine to make them take effect.

After reboot, long in once more.  You need to add the BroadVoice server IP address to /etc/hosts.
Edit /etc/hosts, and add the following line at the end:
sip.broadvoice.com 147.135.0.128

Here the IP address was the one obtained when signing up with BroadVoice.

Once this is done, you can do the rest of the configuration through the web.

Browse To AMP

From your web browser, go to http://192.168.0.40.  You should see the following:
Select “Asterisk Management Portal.”  Log in as follows:

username: maint
password: password

Now you should be at the AMP main screen.
 
Click on “Setup” to bring you to the main setup screen.

Set Up BroadVoice Trunk

Click on “Trunks” and then “Add SIP Trunk.”  You see a blank SIP trunk form.
You will need to fill out the main items on the SIP/Trunk screens. I am using BroadVoice for incoming service only, so I will not administer outgoing trunk information. 
Outbound caller ID:  7237570239
Max channels: 1
The outgoing settings can be left as is, except to fill in the trunk name as BroadVoice.
In Incoming Settings, fill in the following:
User Context: 7327570239
User Details:
callerid=7327570239
context=from-pstn
dtmfmode=rfc2283
fromdomain=sip.broadvoice.com
host=sip.broadvoice.com
insecure=very
secret=********
type=user
user=7327570239
username=7327570239


Check for Phone Registration

At this point, the XLite application should have registered with AAH.  If not, exit XLite (you have to stop it from the tray icon) and restart.  It should say “Logged in”.  If not, see the troubleshooting section below.  To start with, make sure you have assigned the same password in the extension form and in the phone.
On XLite, dial *23 to test audio input and output levels. 


On XLite, dial *23 to test audio input and output levels.


h@ckfr3@k